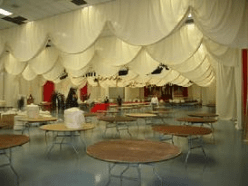
No decorative element covers more square footage faster, cheaper and easier than fabric does. However, creating the elegant look of an Austrian Ballroom or the ambience of the Grand Hotel requires swags, jabots and tassels, and that may be beyond the reach of current resources. Without the rich swags, the result of draping walls frequently looks like convention draping, even when a unique or interesting fabric is used.
Fear not! There are at least two methods that can be used to create fast and easy swags that don’t require a master seamstress and can be used to create many 100’s of feet of swagged wall or ceiling valances in a matter of hours.

Most event professionals have wrestled with making swags on a board with a staple gun and fabric. These can work quite nicely if you only have to do one or two, they can all be individual pieces, and if you have “the touch.” However, they do not repeat identically and cannot be continuous. You also cannot sew classic swags in an accurate pattern without following a complex cutting and sewing pattern.
When faced with the challenge of covering 300′ or more of wall or creating 1000′ or more of ceiling valance on a budget, you do have some options that are easy and result in an elegant look. I am going to discuss and describe two methods here. One of these can be used for either valances or wall draping. The other is a beautiful faux swag that results in attractive elegant valances.
Neoclassical Swags The first method I call neoclassical swags when I am writing a proposal or an article such as this. When we are talking among ourselves, my associates and I refer to this method as “Spangenberg swagging.” Although Spangenberg of New Orleans certainly did not invent it, (we know other designers who have employed it for decades), it was from Spangenberg that we discovered the formula for successful swagging of panels or continuous fabric.
Here is the process for creating a successful swagged valance with the Neoclassical method. Using staples, pins or ceiling clips, run a straight (flat) piece of fabric across or around the area where the swagged valance is to go. When this piece of fabric is run, return to the start and run another piece of fabric. This second piece of fabric is the swagged piece. Attach this piece over the flat piece at two points 20% closer than the overall length of each swag. This is the key.
An example would be to take 60″ of fabric and attach it at two points, 48″ apart. These dimensions work for fabric that is 42″ to 60″ wide and results in a very attractive swag with beautiful curves in the neoclassical style. The resulting negative area above the swagged fabric is filled with the first run of flat fabric. This percentage works for any width of fabric and the designer or decorator can determine the best look with a little experimentation.
This same method can be used to drape walls with vertical panels. In a room with 16′ ceiling height, a horizontal panel is first run around the room. This flat panel can either be the same fabric that is being used to drape the walls, or it can be a contrasting or complimentary fabric. For example, if using a solid color Ultravel® to drape the walls, it might be appropriate to use either a complimentary color or a metallic gold at the top that would be visible as cornice scallops after the room is draped. After the first flat panel is run around the room horizontally, in our example, the individual 16′ wall panels are swagged over it. If the material in the wall panels is 45″ wide, it will be pinned or stapled 36″ apart at each of the top corners. Twenty percent (20%) closer (9″) than the width of the fabric.
(If using 54″ wide panels, they could be attached 42″ apart. The swags can always be closer together than 20%.)
Two people working on a rolling scaffold can easily drape a room using a measuring stick cut to the length of the fabric and marked with the length of the swag. The method for attaching the fabric to the wall or ceiling will vary with the individual circumstances. We have used pins, ceiling clips, wooden battens or staple strips and staple guns. This method results in a rich swagged look with deep curves.
Faux Swagged Valances We developed this method specifically to mask particularly ugly 2′ x 4′ lay-in tile ceilings in exhibit halls, but we now use it whenever a deeply swagged decorative valance is desired and resources or time are limited. This technique is based upon putting enough fullness into a valance panel that it can be tied up into swags. It works particularly well with 108″ FR muslin or 72″ Polytex.
The fabric is cut 1/3 longer than the desired valance. (We usually add a couple of feet in case of variance, which can be cut off later.) Then a three-inch pleat is stapled into the fabric every 18″, using a pinch stapler and folding a 2″ x 3″ card into the pleat for reinforcement. The valance is then hung along the tee track using plastic ceiling clips with holes and standard drapery hooks through the card-reinforced pleat. After the valance is hung tie line is used to tie the fabric up into swags. The swags can be a wide variety of widths using this method so the designer has a lot of choices to make. The tie line can be the same color as the fabric or monofilament, so it will disappear, or it can be a contrasting color or metallic braid to enhance the look. Large tassels, stars, ornaments or other decorative elements can be added at the tie point.
We have been quite successful with both of the techniques described in this article, using FR muslin, Polytex and Ultravel®. We always create a trial sample when using a new fabric with either technique, as different fabrics have different draping characteristics. Always use flame resistant fabric, such as those mentioned above, when covering large spaces with drape or hanging overhead ceiling treatments.
The fabrics mentioned above are available from Scenicsource Fabrics, Inc. on this web site. The plastic ceiling clips we use can be purchased in bulk from Sealtex Corporation, 5906 Grand Haven Rd., Muskegon, MI. Other techniques used in designing and decorating special events are described in detail in Art Of The Event: Complete Guide To Designing And Decorating Special Events, by James C. Monroe, CMP, CSEP (Wiley 2005), www.jcmonroe.com.